Plugin Development
Warning
⚠️ Please do take note that this documentation may not be entirely up to date, as the server undergoes a lot of changes regularly. If you stumble upon any issues, feel free to contact us on Discord!
Setup development environment
You can follow this guide to setup your development environment.
TLDR: setup a .NET project that references Obsidian.API
Writing your first plugin
Here is a sample plugin that you can start with:
using Obsidian.API;
using Obsidian.API.Plugins;
using Obsidian.API.Plugins.Services;

[Plugin(Name = "My First Plugin", Version = "1.0", Authors = "Plugin developer", Description = "My first plugin.")]
public class MyFirstPlugin : PluginBase
{
    [Inject] public ILogger Logger { get; set; }

    public async Task OnLoad(IServer server)
    {
        Logger.Log($"{Info.Name} loaded! Hello {server.DefaultWorld.Name}!");
    }
}
Here is a small breakdown of this sample plugin:
using Obsidian.API: These are your references. Usually you'd only referenceObsidian.APIand all libraries you want to use.[Plugin]: This is the Plugin attribute. This attribute also defines a bunch of important info about your plugin:Name: Your plugin's name.Version: Your plugin's version. We recommend using Semantic Versioning.Authors: Who made this plugin. You! :DDescription: A description for this plugin, to be listed in Obsidian's/pluginscommand.
: PluginBase: Your plugin class should implement thePluginBaseabstract class.[Inject] public ILogger Logger { get; set; }This is a service. More about plugin services can be read here.OnLoad(IServer server): This is an event. These are not the same as .NET's events, as they are invoked with Reflection. More about events can be read here.Logger.Log: This is how you can log messages to the console using the Logger service. It is not recommended to use theConsole.WriteorConsole.WriteLinemethods, as these may block server threads slowing down Obsidian.
Plugin Structure
PluginBase
All plugins must derive from the PluginBase class. This is important for receiving events and making the plugin work as a dependency for other plugins. It is the only requirement.
public class MyFirstPlugin : PluginBase
{
}
PluginAttribute
You should add PluginAttribute to provide more information about your plugin.
[Plugin(Name = "My First Plugin", Version = "1.0")]
public class MyFirstPlugin : PluginBase
{
}
You can obtain this information at runtime through the Info property.
Events
Plugin classes can contain methods with a specific signature, which will be called when certain events occur on the server.
public async Task OnPlayerJoin(PlayerJoinEventArgs playerJoinEvent)
{
    var player = playerJoinEvent.Player;
    await player.SendMessageAsync(IChatMessage.Simple($"Welcome {player.Username}!"));
}
Currently available events
(more will be added in the future)
| Event | Arguments | Description |
|---|---|---|
| OnLoad | IServer | Gets called when the plugin loads for the first time |
| OnIncomingChatMessage | IncomingChatMessageEventArgs | Gets called when client sends a chat message to the server |
| OnInventoryClick | InventoryClickEventArgs | Gets called when player clicks on a slot in a window |
| OnPermissionGranted | PermissionGrantedEventArgs | Gets called when player is granted a permission |
| OnPermissionRevoked | PermissionRevokedEventArgs | Gets called when player has permission revoked |
| OnPlayerJoin | PlayerJoinEventArgs | Gets called when player joins the server (before chunks get sent) |
| OnPlayerLeave | PlayerLeaveEventArgs | Gets called after player leaves the server |
| OnPlayerTeleported | PlayerTeleportEventArgs | Gets called when player gets teleported |
| OnServerStatusRequest | ServerStatusRequestEventArgs | Gets called when client asks for server state |
| OnServerTick | Gets called at the beginning of each server tick |
At the moment, all events (except for OnLoad) must return a Task. If your method doesn't need to be asynchronous, you can return Task.CompletedTask
Services
Obsidian provides services, each one with specific functionality. If marked with InjectAttribute, they are automatically injected when the plugin is loaded.
public class MyFirstPlugin : PluginBase
{
    [Inject] public ILogger Logger { get; set; }
}
Currently available services
| Service | Description |
|---|---|
| IDiagnoser | Used for process diagnoses. |
| IFileReader | Used for reading from files. |
| IFileWriter | Used for creating and writing to files. |
| ILogger | Used to perform logging. |
| INativeLoader | Used for loading and using native libraries. |
| INetworkClient | Not implemented |
This list is not final, more services will be added in the future.
How to use services
If marked with InjectAttribute, services are automatically injected when the plugin is loaded. Some services have IsUsable property, meaning that they need a certain permission to be used. If you call security-critical method when service isn't usable, a SecurityException will be thrown.
public class MyFirstPlugin : PluginBase
{
    [Inject] public IFileWriter FileWriter { get; set; }

    public async Task OnLoad(IServer server)
    {
        if (FileWriter.IsUsable)
        {
            FileWriter.WriteAllText("file.txt", "content");
        }
    }
}
Plugin permissions
Plugins could potentially contain malicious code. To avoid plugins from accessing local files, sending network requests, running subprocesses, compiling their own code etc., we added a plugin permission system. A server owner can grant and revoke permissions to do security-critical actions for each plugin. If your plugin references libraries like System.IO or System.Reflection, it needs corresponding permissions to be granted in order to run.
Secured Services
If you want your plugin to run, even though it's missing some permissions, you can use secured services. You can read more about services here. Secured services should provide an alternative to security-critical system libraries. If your plugin doesn't have permissions to use such services, calling its methods will throw a SecurityException. You can check whether you have permissions to use the service through the ISecuredService.IsUsable property. A list of ALL services can be found here.
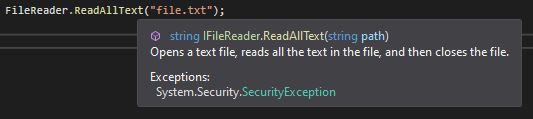
Some methods in secured services are usable even when IsUsable is false, because they are not security-critical themselves. You can tell by the "Exceptions:" in method description:
Permissions list
| Permission | Description |
|---|---|
| CanWrite | Allows writing to files. |
| CanRead | Allows reading from files. |
| NetworkAccess | Allows performing actions over network. |
| Interop | Allows using native libraries. |
| Reflection | Allows performing reflection. |
| RunningSubprocesses | Allows using System.Diagnostics and System.Runtime.Loader libraries. |
| Compilation | Allows using Microsoft.CodeAnalysis and related libraries. |
| ThirdPartyLibraries | Allows using 3rd party libraries. |
What are plugin dependencies
Plugin dependencies are other loaded plugins, which you can reference and use in your code. In this article you can find out how to reference them through PluginBase. Another way is using dependency wrappers.
How to reference dependencies
You can reference plugins by adding a property/field of type PluginBase and applying DependencyAttribute onto it. When another plugin is loaded and matches the name of your property/field name, it will be injected automatically.
[Dependency]
public PluginBase AnotherPlugin { get; set; }
AnotherPlugin is going to be null, until plugin named "AnotherPlugin" is loaded.
If you want to name your property/field differently than the target dependency, you can use AliasAttribute as in the example:
[Dependency, Alias("AnotherPlugin")]
public PluginBase MyDependency { get; set; }
Aliases can match both class name and PluginAttribute name of the dependency.
All dependencies are "required" by default. Your plugin won't load until all required dependencies are present. You can set dependency to be optional like so:
[Dependency(Optional = true)]
public PluginBase AnotherPlugin { get; set; }
Don't forget to check optional dependencies for null, since their presence is not guaranteed.
Since older versions of plugins may be missing certain functionality that you need, you can set minimal dependency version. All plugins with lower version will be ignored, even if their name matches.
[Dependency(MinVersion = "2.0")]
public PluginBase AnotherPlugin { get; set; }
The version string should contain major, minor, [build], and [revision] numbers, split by a period character ('.')
How to use dependencies
You can obtain dependencies full information with PluginBase.Info
Calling dependencies methods can be done with object Invoke(string, object[]), object InvokeAsync(string, object[]) or generic T Invoke<T>(string, object[]), Task<T> InvokeAsync<T>(string, object[]):
if (dependency != null)
{
    int sum = dependency.Invoke<int>("Add", 1, 2);
}
Since this approach is using reflection, it's rather slow. For frequent calls you should cache delegate obtained with T GetMethod<T>(string, Type[]). There are special methods for obtaining property getters and setters - Func<T> GetPropertyGetter<T>(string) and Action<T> GetPropertySetter<T>(string).
var addMethod = dependency.GetMethod<Func<int, int, int>>("Add", new[] { typeof(int), typeof(int) });
int result = addMethod(1, 2);

var getFoo = dependency.GetPropertyGetter<int>("Foo");
int foo = getFoo();

var setBar = dependency.GetPropertySetter<int>("Bar");
setBar(foo);
For more complex scenarios, it's convenient to use dependency wrappers.
Dependency Wrappers
You should read about dependencies first.
Why wrappers?
Let's say that you want to use this plugin as a dependency:
public class CarPlugin : PluginBase
{
    public string CarName { get; set; }
    public void StartEngine() { /* CODE */ }
}
...and you need to access both CarName and StartEngine.
Normally you might do something like this:
public class MyPlugin : PluginBase
{
    [Dependency]
    public PluginBase CarPlugin { get; set; }

    private Func<string> getCarName;
    private Action<string> setCarName;
    private Action startEngine;

    public void OnLoad(IServer server)
    {
        getCarName = CarPlugin.GetPropertyGetter<string>("CarName");
        setCarName = CarPlugin.GetPropertySetter<string>("CarName");
        startEngine = CarPlugin.GetMethod<Action>("StartEngine");
    }
}
But there is a better way!
All you need to do is make new class that derives from PluginWrapper with name-matching properties and use that as a dependency instead!
public class MyPlugin : PluginBase
{
    [Dependency]
    public CarPluginWrapper CarPlugin { get; set; }

    public class CarPluginWrapper : PluginWrapper
    {
        public Func<string> get_CarName { get; set; }
        public Action<string> set_CarName { get; set; }
        public Action StartEngine { get; set; }
    }
}
Property names don't need to match if you use AliasAttribute:
public class CarPluginWrapper : PluginWrapper
{
    [Alias("get_CarName")]
    public Func<string> GetCarName { get; set; }
    [Alias("set_CarName")]
    public Action<string> SetCarName { get; set; }
    public Action StartEngine { get; set; }
}
Then you can even simulate accessing properties like so:
public class CarPluginWrapper : PluginWrapper
{
    [Alias("get_CarName")]
    private Func<string> GetCarName { get; set; }
    [Alias("set_CarName")]
    private Action<string> SetCarName { get; set; }

    public string CarName { get => GetCarName(); set => SetCarName(value); }
}
Chat Messages
Warning!
You shouldn't implement the IChatMessage interface yourself. Use the IChatMessage.CreateNew method to create a new instance instead.
How to create a chat message
There are multiple ways of doing this:
var chatMessage = IChatMessage.Empty;
var chatMessage = IChatMessage.Simple("Hello World!");

chatMessage = IChatMessage.Simple("Hello World!", ChatColor.Gold);
var chatMessage = IChatMessage.CreateNew().AppendText("Hello World!");

chatMessage = IChatMessage.CreateNew().AppendText("Hello World!", ChatColor.Gold);
How to send chat message
The most basic ways of sending chat messages are with an IPlayer:
await player.SendMessageAsync(chatMessage);
or with IServer:
await server.BroadcastAsync(chatMessage);
Adding colors
You can add color codes directly into chat message. For example "§aHello §fWorld!".
Another way is using ChatColor like so: $"{ChatColor.BrightGreen}Hello {ChatColor.White}World!".
This is a list of chat colors and corresponding their color codes:
| ChatColor | Color code |
|---|---|
| Black | §0 |
| DarkBlue | §1 |
| DarkGreen | §2 |
| DarkCyan | §3 |
| DarkRed | §4 |
| Purple | §5 |
| Gold | §6 |
| Gray | §7 |
| DarkGray | §8 |
| Blue | §9 |
| BrightGreen | §a |
| Cyan | §b |
| Red | §c |
| Pink | §d |
| Yellow | §e |
| White | §f |
Adding events
Events can be added to text with ITextComponent. Same as with IChatMessage, you shouldn't implement this interface, but use CreateNew method instead.
var textComponent = ITextComponent.CreateNew(ETextAction.ShowText, "☺");
where ETextAction can be one of the following:
- OpenUrl
- RunCommand
- SuggestCommand
- ChangePage
- ShowText
- ShowItem
- ShowEntity
Then, you can set the component to be activated upon Click/Hover event as in the example:
var chatMessage = IChatMessage.CreateNew();

chatMessage.ClickEvent = textComponent;
// or
chatMessage.HoverEvent = textComponent;
There is a short way of writing it:
var chatMessage = IChatMessage.CreateNew()
    .WithHoverAction(ETextAction.ShowText, "☺")
    // or
    .WithClickAction(ETextAction.ShowText, "☺");
Extras
You may want your event to only affect one part of the chat message. It is achievable by splitting your chat message into extras, then appending those. For this you should use AddExtra(IChatMessage) method. See the example:
var chatMessage = IChatMessage.Simple("If you want to see something, hover over ")
        .AddExtra(IChatMessage.Simple("this", ChatColor.BrightGreen).WithHoverAction(ETextAction.ShowText, "Amazing!"));
Commands
A good plugin of course comes with commands that control it's behavior. Adding commands with Obsidian is quite easy. To add a command to your plugin, all you need to do is add a method with an attribute and a specific signature to your PluginBase class.
[Command("helloworld", "hello")]
[CommandInfo("Sends Hello world! to chat.", "/helloworld")]
public async Task PluginCommandAsync(CommandContext ctx)
{
	Logger.Log($"Executed Hello World!");
	await ctx.Player.SendMessageAsync("Hello world!");
}
In this example, there are a couple of thing that stand out. Namely:
[Command("helloworld", "hello")]to define a command's name, and it's aliases.[CommandInfo("Sends Hello world! to chat.", "/helloworld")]To define a command's description and add aliases, and to describe it's default usage.CommandContext ctxis required as a command's first argument.Taskis always the return type.
Command Arguments
Command arguments can easily be added by adding parameters to your command method.
[Command("helloworld", "hello")]
[CommandInfo("Sends Hello world! to chat.", "/helloworld <text>")]
public async Task PluginCommandAsync(CommandContext ctx, string text)
{
	Logger.Log($"Executed Hello World! {text}");
	await ctx.Player.SendMessageAsync($"Hello world! {text}");
}
Remaining text argument
By adding the RemainingAttribute to the last string argument, the command handler will read all remaining command text to a string.
public async Task PluginCommandAsync(CommandContext ctx, [Remaining]string text)
Command classes and subcommands
It is possible to define a complex class structure to define commands and subcommands. Do it as following. Take a good look at the comments for more detailed information about what is going on.
[CommandRoot]
public class MyCommandRoot
{
	[Command("helloworld", "hello")]
	[CommandInfo("Sends Hello world! to chat.", "/helloworld")]
	public async Task PluginCommandAsync(CommandContext ctx)
	{
		Logger.Log($"Executed Hello World!");
		await ctx.Player.SendMessageAsync("Hello world!");
	}

	/// This is a command group. It can nest multiple commands, and other command groups "infinitely".
	[CommandGroup("whatsup")]
	[CommandInfo("Another command")]
	public class MySubCommandRoot
	{
		[GroupCommand]
		public async Task DefaultCommandAsync(CommandContext ctx)
		{
			// This is the default command for this command group.
			// This will be executed as '/whatsup'
		}

		[Command("yo", "hee hee")]
		[CommandInfo("More commands.")]
		public async Task SubCommandAsync(CommandContext ctx)
		{
			// This is a subcommand for this command group.
			// This will be executed as '/whatsup yo'
		}
	}
}
Command classes marked with CommandRoot will automatically have all their subcommands registered.
Pre-execution checks
Commands can have pre-execution checks. These are executed before a command will be executed. These can be enabled as easily as adding an additional attribute to your command.
Currently, only the RequirePermissionAttribute is implemented. Custom execution checks can be implemented by developers as they please.
[RequirePermission(PermissionCheckType.All, true, "MyPlugin.Permission")]

// Arguments in order: Whether All or Any permission should be granted, Whether this command also works with op, Permissions to check.
TODO improve
Command Dependencies
To register dependencies for your command classes, build a new CommandDependencyBundle.
var bundle = new CommandDependencybundle();
await bundle.RegisterDependencyAsync(Logger);
There are two ways to use this dependency in your commands.
Option 1
The first option is to add a Constructor to your CommandRoot and your CommandGroup marked classes.
public Logger MyLogger;

public MyCommandRoot(Logger myLogger)
{
	this.MyLogger = myLogger;
}
NOTE: Command classes do NOT persist across command executions. Beware!
Option 2
Another option is using the CommandContext to obtain dependencies.
// This would be in a command method.
var myLogger = await ctx.Dependencies.GetDependencyAsync<ILogger>();
Creating custom argument handlers
TODO
Creating custom pre-execution checks
TODO